Friday, 31 January 2020

DISASTER !!! at Dalton Manor (beware this is a long post get a cuppa before you start)

Well there I was sitting in my craft room making pictures to hang in the dolls house Dining room when suddenly I heard a CRASH ! 
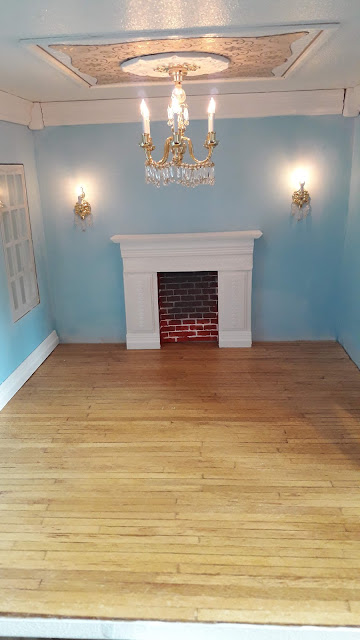
 Looking round I discovered it was my chandelier in the Morning room which, in true Only Fools and Horses fashion had fallen and crashed onto the Morning room floor. On further inspection (sounding like Sherlock Holmes here ) I discovered that the wire had snapped. I don't know how but there it was. I've rewired it and thought it was fine then plugged it into the house electrics and blew the fuse.....3 times. So I've now had to send for another light and fuses.....clearly I'm no electrician lol.

the broken chandelier 😭

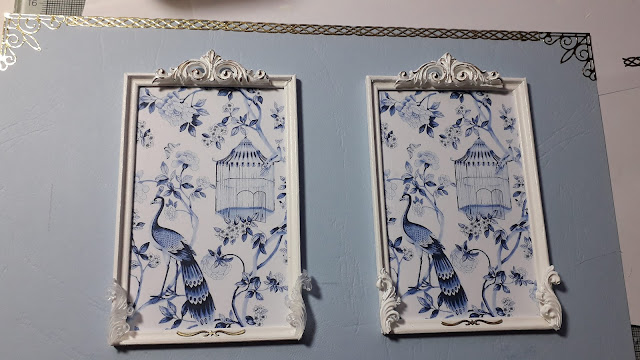
Moving on from my disaster to much better things. A few pics of one of the picture frames I made ...had great fun doing this we project...they are very ornate as all Georgian decor was and very gold.
I used dado rail to make the frame and decorated it with some mouldings that I made with liquid Fimo (wonderful stuff ) then painted the whole thing with Liquid Leaf which gives a lovely gold shine.


You can see the finished picture later on in the Morning room and also more frames that I made in the Dining room. You will notice that I changed the picture to a lovely female one.
I decided that the Morning room panels were not ornate enough for the Georgian period so I changed them. I downloaded some Chinese blue wallpaper and made 4 wall panels and again decorated them in the same way as the frames.  They really lift the room into the Georgian period. Next I added some moulding to the front of the Charles 111 window seat.... it needed to be more golden...pics below..

adding the mouldings


 Making the moulds

adding some gold to the moulds and a gold border and corners to the room

Charles 111 window seat with moulding


Love this picture


No curtains yet that will come later


no chandelier

Dining room pictures and a few more to be added around the house although I still need to make more.


The Kitchen Rooms

A further update on the kitchen rooms, below are pics of how it looks so far.
Doors are oak stained this time as below stairs ( as it was called) was mostly wood decor with only cupboards and maybe tables got painted but not white usually green ,cream or blue

The scullery with stair leading to the entrance hall and the pantry where all the food was stored. I still have to wire the lights in here and add the sinks and a copper (a copper boiler which was heated with a fire underneath and bricked all round and was usually in the corner)  I've also added a few shelves

Fire has been added to the kitchen range


Lights on and fire glowing..beginning to look better now did you notice the ceiling beams ? These were used to hang numerous things like pots and pans and utensils among other stuff. Still to add cupboards and sink and maybe another table ....

 pots and utensils hanging above the range


 to the left is the pantry and then we have the servants hall. This is where the servants and butler and housekeeper relaxed and had their meals. It's also where all the china and silverware was kept sometimes under lock and key.  A corner might be reserved for the housekeeper to do the accounts.

 making the beams


Well if you made it to the end of this post well done you deserve a cuppa. The house is beginning to look a lot more lived in now but still a long way to go. Until next time thanks for your visit and all your lovely comments xxx


Sunday, 15 December 2019

The basement and kitchen rooms ....


The past few months have been really busy but I've managed to get some time to work on the basement.
 In Georgian homes the kitchen rooms which usually included the main kitchen the pantry and servants hall, the butlers room and the house keepers room and possibly a wine cellar too were all in the basement.  This house has 3 rooms in the basement but I have room to make it 4 if I decide later on. The pics below show how I made the flag stone floors and the kitchen range which usually takes up a full wall.

Firstly the flag stone floors.

I used 220grm weight textured card and scored it to resemble flagstones then I coloured it with oil pastels using 3 different colours to get the gradient of colour that I needed.


The floor resembles the stone floors of the era.

Next I started work on the kitchen range which in those days was always black and had a central fire heating the top and ovens on either side. I used Bass wood for this as it's strong enough but also light and takes a stain or paint really well.

 I built a false wall around the range 

 and made stone walls from painted egg cartons, then I tiled the wall above the range with blue and white tiles printed on to gloss card, these tiles were very popular in the 18th century.


Next I put a top across made from mount board and painted it to look like copper with a rail to hang the pots and pans on. Kitchens then were full of copper pots and pans and copper jelly moulds.


I needed to make large hinges for the oven doors and decided that this cutting die I have for a butterfly body was the right size and shape. 

So I bent the ends and put them round cocktail sticks to make the heavy hinges for the oven doors, I was really pleased with the finished look.

I dry brushed some copper paint to give it an aged look.


The handles were made from jewellery findings and I added some logs too.


The fire will be added later as I haven't found one that will fit yet but it will have a realistic flickering glow. 

To the left I made a small cupboard which will have a handle in due course.


This pic shows the finished kitchen wall and the kitchen table. Loads more to do to the kitchen but so far it's looking quite good. Thanks for visiting see you next time.


Thursday, 19 September 2019

A bit more progress......


Hello again. I've been busy doing the ground floor and putting in the wall panels, dado rail and skirting, below are a few pics just to update on the present state of the house.
 As you can see all the lights are now in and working, next are the doors for the main house and then I will fit all the skirting, dado rails and wall panels in the rest of the rooms. I still need more fire surrounds too. That should keep me busy next week.


A few close ups

The morning room

Entrance hall and first floor landing

 The Dining room

top bedroom left

Top landing

Top room right, possible music room

Gents bedroom/study

Middle landing chandelier (my favourite)

Internal doors to be painted

That's the update for today more to come when the doors are fitted and then I can start on the outside and roof and the basement, not sure which will come first....it will be fun whatever way I do it and that's what it's all about. A big thank you for your comment too It's lovely to know that you are enjoying the journey. xxx


Thursday, 5 September 2019

Lights at last....and a whole lot more


Its been a while but I finally managed to get the lights working in the house, and what a difference it makes to the overall feel of it. It's starting to come alive now.


I've been making a couple of fire surrounds too one for the blue morning/drawing room and one for the dining room. I made them from Bass wood which is very light and used for model making. After adding a couple of trims I painted them white then added some brick effect to the inside. Still have to get the actual fires but that's further down the line.


I might highlight them with some gold later on I will see how the rest of the decor goes.

*************

Below is the first attempt at panelling for the morning room, it was okay but I really wanted it a bit more refined so I binned that lot and started again


I ended up changing the shade of blue as well this one is a bit lighter and looks a lot better. This time I made the panels on card and used some cutting dies for the top and bottom, I mounted these on to the same card and this will then be stuck to the walls. I spent the whole day yesterday doing all three walls ....I was on a roll so just kept going till it was done. I'm really pleased with them now but have still to attach them to the walls, that's a job for another day.


 below is the cutting die I used


One more update to go

Tiny plates and perfume bottles. The plates were made with pearl card and a 1 inch craft punch I then put on tiny nail decals and painted them with clear varnish. I will make some with Fimo clay later on but I just had this idea and had to try it. Happily it worked well, and was really cheap to make.


The little perfume bottles were made with glass and crystal beads and are 15mm high, the silver plate is made with a craft punch and craft card again. 


Well that's it for this update at last I can see some progress happening and I will be doing the panels in the other rooms soon. I have ordered some doors too as I need them fitted before I can fit the panels......as I found out when I tried to fit them.
Bye for now...